
Ukulele Case Tutorial!
With the possibility of toting my ukulele around, I wanted to be able to protect it. I have a Makala soprano ukulele that came with a flimsy case that doesn’t do much good. I have only used my sewing machine once before this project and that was for a t-shirt quilt, so I didn’t want something too advanced. I set out to find some online tutorials regarding the topic and was VERY happy to find some!! Be sure to click the pictures to view the original sources!
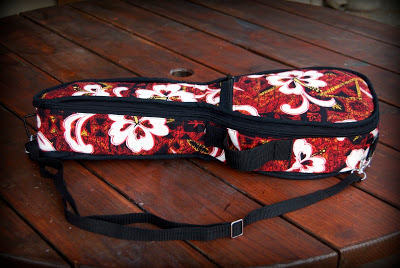
Case #1
I really liked this case! I love the longer strap on it and it looks very clean and professional! However, I found the steps on how to make it were lacking and I wasn’t going to be able to follow it as a novice seamstress. Alas, I was able to learn from the mistakes they mentioned and for that I was thankful for the inspiration and wisdom!
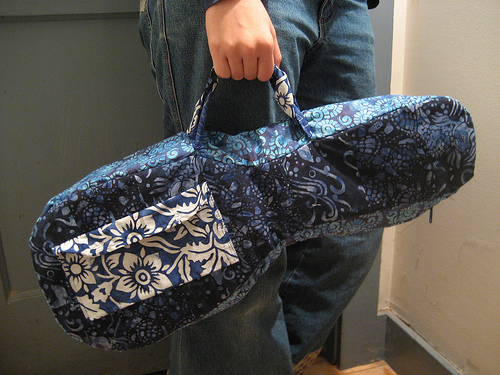
Case #2
I really liked how this second case looked! It was more of a quilted design and I loved the appliqué used on it! Again though, the directions were not precise enough for me to follow, so I merely used it as inspiration for my own.
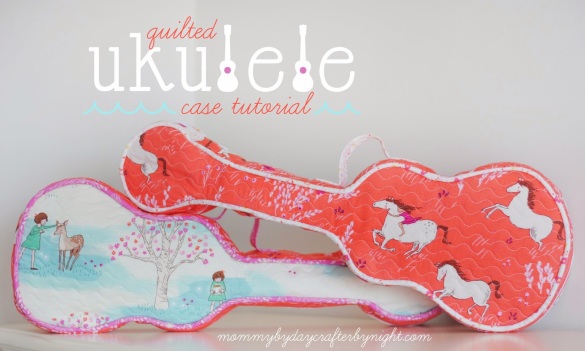
Case #3
This one was a winner!! I loved the cute and fun designs and the directions were VERY good! In the process of making my own, I tweaked the tutorial a little bit, which is why I’ve decided to create my own! First things first:
What You Need:
- Scissors
- Sewing Machine
- Zipper Foot
- Duck Cloth (1/2 yard) – Used to add stability. Isn’t completely necessary if you’re okay with a flimsier case (and is easier to sew without it), but I would recommend it or something similar
- 3/16″ Cotton Cording for piping (3 1/4 yard – 3 1/2 yard) – By the end of going around my case twice I only had 3-4 inches left, which was kind of close for my liking.
- 1 Zipper (or possibly a second if you want a pocket on the outside as in the 1st case example) It was suggested to use a 36″ robe zipper, but I opted for a Parka zipper which was colorful and larger, but it was also only 30″ long. While I think the longer zipper might be better, with a good placement, a 30″ one did just fine
- Interior Fabric
- 1/2 yard for top/bottom of inside – I would suggest maybe 3/4 yard if you want to use the same fabric for your liner inside. I was wasteful when cutting out my top/bottom pieces to get pretty designs and because of that I had to piece my lining together. However, I don’t think it is that noticeable. So get more so you can get pretty designs or use less and make use of your space better.
- Exterior Fabric
- 1/2 yard – So for the design I chose I really only needed 1/4 yard for the two patterns I chose (so 1/2 yard total).
- Piping Fabric – 1 Fat Quarter
- Batting/Fusible Fleece – 1/2 yard – 1 yard
- The first fusible fleece I bought was very thin and didn’t offer much protection, so I had to use more of it and ended up having to buy more. The second time I got some thicker batting that was on a roll and was MUCH happier with that. So I would suggest skipping the fusible fleece all together and get some nice medium-thick batting.
*If you want to make a pocket, decide what fabric you would want to make it out of and add 1/4 yard of fabric for that.
Here are the fabrics that I used for my project. The tie-dye-ish fabrics are for the outside, the owl is for an appliqué on the front, blue is for binding, and the paisley one is for the inside. Then you can also see the duck cloth and extraordinarily thin fleece that I wouldn’t recommend. 
Step 1:
Trace your ukulele onto a piece of paper (I attached multiple pieces together using tape so I had a piece large enough). Make sure you leave 3/4 – 1 inch of space around it for seam allowances. If you want your ukulele to be less snug, then add more. This is also where you get to decide what shape you want your case to take on. I wanted mine to look more like a ukulele, but didn’t want the round head, so I adjusted for that. It also helps if you just trace 1/2 of it and then fold the paper in half and trace the other side. That way everything is symmetrical. I cannot draw that straight, so this was a way to avoid a wonky case.

Step 2:
You’re going to use your newly created template to cut two pieces (top and bottom) out of duck cloth, two pieces out of your inside material, and if you’re only doing one fabric for your exterior, two pieces of that as well. Otherwise, go ahead and follow the next few steps. To trace my template I used a sharpie or a pen, depending on the material and if I could see it or not. For some of my darker material, I had to pin the template onto it and cut around that.
Step 3 (if you have multiple fabrics for your exterior):
Measure the length of your ukulele template and add 1 – 1 1/2 inches onto it. Now divide that number by the width of your strips. I used 4″ strips, so I would divide by 4. This will tell you how many strips you’re going to need total. Divide that number in half if it’s even, otherwise you will have one more strip of one design than the other. I then made the width different, depending if the strip was for the neck or the body. I think it was about 3″ for the neck and 5″ for the body, but make the strips however long they need to be so the fabric covers the whole template.

Pieces cut
Now you’re ready to sew! Use ~1/4″ seam allowance and sew all your pieces together. For mine, the design was on both sides, so I didn’t worry about sewing them on incorrectly, but make sure you pay close attention to how you’re sewing them! You want the two good sides facing each other when you sew!

Pieces sewn (back view)
Now to smooth things out we’re going to iron our edges down so everything is flat.

Ironed edges

Front view
Now we attach our template to it and cut around it!

Getting ready to cut

End result!
Make sure to do this twice, once for the top and once for the bottom. After you’re sure you’ve cut everything you need to cut with your template (2 pieces exterior, 2 duck cloth, 2 pieces interior), go ahead and cut around your template ~1/2″ so we can now use our template for the batting. If your batting is thicker, you might consider cutting your template down ~3/4″ or so, but I left mine at 1/2″. BUT before you cut it, measure the perimeter of it and write down this number! You will need it later when we make the sides of our case!

New template is made!
Now it’s time to cut out the batting! Originally when I had the thinner batting I decided I needed to cut more of it, so I used all I had (1/2 yard). However, ideally you’d only need to make 4 of these – 2 for the inside, and 2 for the outside.

Step 4:
Now it’s time to sew! Lay the batting on top of the duck cloth, and the exterior fabric on top of the batting (good side up). Pin this all together and quilt as you desire. I decided to do random squiggle lines since I’m a novice quilter, but feel free to do whatever you want! We just want to make sure that everything’s held together nicely and add some pizzazz. You’ll want to do this with both the top and bottom exteriors.
Step 5:
Now it’s time for the binding and piping! I used this tutorial to sort of guide me through the process, which includes a link to making bias strips as well (make sure they are 1 1/2 inches thick), but I would also recommend this tutorial to see how to cut your strips initially (note that bias tape is the same thing as binding in these instances. There are only slight differences towards to end of making them. Binding you fold your edges inwards where as for the piping you won’t).
Step 6:
Now it’s time to pin your piping onto the front of your case and sew it on with your zipper foot! Make sure to repeat this for the other half as well.
Step 7:
This is a great time to add any appliqué or other things you want to add onto the outside of your case (unless you want a pocket, then you should have done that before putting the binding on). I wanted to put an owl on mine (only because they didn’t have any good penguin fabric), so I cut out my favorite owl making sure to leave a border around him, pinned him where I wanted him, then started with his nose and eyes (working my way from the inside out). There are some really great decorative stitches out there, so you can add all kinds of flavor to appliqués! After that I went ahead and used a blanket stitch around the border. It was kind of difficult with so many odd corners/edges – which is also why I decided not to fold anything in – plus I like the raw look with it. The goal is to make sure your appliqué or whatever decorations you have are in tact and are not going to be going anywhere anytime soon!
Step 8:
Now it’s time to make the edges of our case! Start by measuring the depth of your ukulele (mine was about 2 1/4inches) and measure the perimeter of your template if you didn’t write down that number earlier like I suggested. This is another area where you can keep your uke snug or give it extra wiggle room – if you want it more loose, then go ahead and add on an extra 1/2 inch. We also need to put our seam allowances in. For this you will add 1 1/4 ” and use a 1/2″ allowance. So all together I was at 3 1/2 mark, but I went ahead and made it 4″. I think since I added in some extra padding, this was the right decision, because it still feels pretty snug to me. Right now our focus is on our zipper, so we need to make two strips 2″ x 30″ (or however long your zipper is) (substitute the 2″ for however wide your number was divided by 2. Mine was 4 so I need two strips each 2″ wide). Cut this out of duck cloth and your exterior fabric. Then you will need to cut batting the same size, but making sure to trim it down 1/2″ again. Now do as we did with our exterior top and bottom and layer it duck cloth, batting, fabric, pin it, then quilt it. For this I decided to do a wavy line. Do this for both sides. Now it’s time to attach the zipper with your zipper foot! Once again, make sure you have your fabric facing the correct way so you don’t sew things on backwards. For this part, I would follow Steps 6 and 7 from the Mommy by Day Crafter by Night tutorial. The idea is to have the Width of your two panels with your zipper be the width you decided upon (so 4″ for me). You can tell from one of the pictures that one of my panels was a little shorter than the other one somehow. Everything worked out okay, I just used less zipper. I would recommend making your panels go all the way out to the end of where the zipper goes, not just where the teeth go.
Step 9:
Now we need to finish making the other half of our sides! Take the perimeter amount minus the zipper amount and that is the length you will need to cut (use the same width, which was 4″ for me – or just measure the two panel/zipper combo to get your width). You will also want to add on 1/2″ for your seam allowances. So if my perimeter was 54″ and my zipper was 30″ then I’d need my piece to be 4″x24.5″. Cut this piece out of your side material and duck cloth, and another piece out of batting (1/2″ shorter on all sides). You will then pin them all together and quilt them however you like (I did two wavy lines on mine that intersected which worked out kind of cool and sort of met up with the other lines I did on the two panels for the zipper). Once that is done you will sew it to the zipper section to create a circle (Step #9 from the same tutorial I linked above shows a great picture of this).
Step 10:
Now it’s time to sew our side to one panel of our case! I don’t think it matters whether it’s the top or bottom, just make sure your zipper will be in the right place! It took me a few minutes to make sure I had everything how I wanted it. You should also mark where the zipper will go on the other panel so that they line up. As I was pinning the sides to my second panel, they didn’t the first time, so I had to start over with my pinning. So, save yourself some time and do it right the first time! This part was probably the trickiest. Once you have your sides pinned to one of your panels you will be sewing around it. Make sure to use your zipper foot! You want to get as close as possible to the piping (without actually going into the piping which happened to me a couple of times). What I did was go around the whole thing once and then inspected it and went over the sections that needed it again. Make sure you inspect thoroughly! At one point while I was nearing the end of making my case I noticed something had come out of it’s stitch because I didn’t sew it well enough and I had to go back and fix it!
Step 11:
Woohoo!!! Progress is being made and the case is starting to come together!! Now it’s time to attach our second panel and form an actual case! Make sure the pretty fabric is inside of your case for this (so our seams end up inside), and make sure you have the zipper undone at least part way so you can unzip it after it’s sewn together! This will work exactly like step 10 did! You can tell from one of the pictures below that at the handle, my case is a little twisted. I think part of this was not lining up my zipper well enough and while it is noticeable, it adds to the hand-made-ness of it!
Step 12:
Time to add a handle!! I also wanted to add a strap to mine, but at this point in the game, decided I just wanted to finish it faster and not have to think about adding any more features, so I skipped out on it. But if you did want to add a strap, this would be the time to do it as well! So for your handle you’ll want a 4″x7″ piece of fabric. If you wanted it to be a little more durable then I would suggest maybe adding duck cloth to it, but then it will be harder to fold.

Now that we have our 4″x7″ piece of fabric, go ahead and fold in the edges 1/4″ on the short side so it’s 4″x6.5″. This was another step I really had to think about to make sure I was doing it correctly.

Next fold it in half and press it with an iron. Now it will be 2″x6.5″.

Now go ahead and press the raw edges in from the long sides and then fold it in half again so that it’s 1″x6.5″.
 Now you’ll want to stitch around the whole thing (either by hand or with your machine). Now it’s time to attach it to our case! Find where you want it then pin it in place. This part you’ll have to do by hand. What I did was make a 3/4″-1″ square and put an X in the middle of it for both ends. Depending how close the two ends are you can either get a tall handle or a longer but thinner handle.

Step 13:
Almost there! This was about the point where I felt like I was almost done, but really I might have only been 1/2 – 3/4 of the way done. You should already have your two (top and bottom) interior pieces cut. Make sure to also cut some batting as well. I wanted my case to be very protective, so I tried to include as much as I could. You’ll also need to cut your sides for the inside (and I put batting here as well). I chose to do all of mine in the same fabric. I also ended up cutting tinier pieces and sewing them together to make better use of my fabric (and because I was running low on this fabric since I was being choosy on my designs for the top and bottom pieces). Just make sure they are the same length as you did above in step 8! You’ll also go ahead and sew it together into a circle like you did above.

An example of my pieces for my interior sides.
Step 14:
You could probably sew the interior in several ways. I opted for hand-stitching it and started with the bottom of my side lining. When you’re pinning your sides it is VERY important to line up your zipper space appropriately. I messed this up at least twice, which took time to take my pins out and start over.

This is the finished product after stitching the siding around the zipper. It was easiest to do this without the batting. The next step was adding in the batting around the sides of the bottom and pinning the lining to the bottom. This was to keep everything in place while I got my bottom piece situated. While time consuming and sometimes pokey (those pins are sharp!), I found this to be the best way to make sure everything was where I wanted it. I ended up putting the case on a pillow so the pins wouldn’t hurt my legs while I worked on it. Place the bottom batting down, and then the fabric. Now go around the edges and remove pins holding the siding down, folding over the main fabric over the batting, and then pinning them both in place.

After you’re done pinning, this is what it should look like! I liked to also go around and try to pull up the sides to see if they actually got pinned or not. It’s a good thing I checked because some of them needed to be pinned better! While sewing I tried my best to stay under the piping and zipper as close as possible. Sometimes this was difficult to do, but if you use a coordinating fabric, then it should be fine either way. Now get to sewing!

See what I mean about a pokey situation?

It’s not perfect, but it’s okay, because you can definitely tell it was hand-made!
Step 15:
So I opted to put a pocket in the inside of my case! I wanted one with a zipper on the outside, but realized I would be covering up a lot of my designs, so decided to move it to the inside. I didn’t have anything to go off of for this, so I cut a piece of fabric the same size as the base of the ukulele template I had and then just sewed the whole thing onto the top fabric layer. To prevent fraying on the opening of the pocket, I sewed the fabric under it self about 1/4 ” before sewing it to the main fabric layer.


Inside the pocket!
I had the hardest time making it look good at the top edges. I just sort of left it the way it was with some unfinished corners since I didn’t know how to make it better and was tired of messing with it. But it still looks good!
Step 16:
Back to sewing! Now it’s time to put the top layer on! Repeat step 14 for this.

It felt so great to see everything come together! I could tell I was almost done!

Step 17:
Enjoy!!!
The largest noticeable flaw is with the stem of my case. It’s sort of twisted, which came from putting the outside of my case together. Regardless, my ukulele feels right at home in its new case! I love it! Sometimes I wish I had included a strap somewhere to allow for carrying it more easily (I usually have a heavy backpack, sometimes a coat, and this to carry), but the handle works pretty well.
One last final note, even while using expensive fabrics (mine were normal price $12.99/yard) if you can find them on sale (got mine for ~$9.99/yard) you will save a good chunk of money! Also make sure to use any coupons you find off of regular priced items (this saved me $2.59 off of my cord). Without the cost of buying a zipper foot ($5.59), and taking into account the excessive amounts of two fabrics I had left over, I spend about $32 (without tax) on my case. In my opinion, that’s not bad at all for something that is unique and to your liking, and you can tell everyone you made it yourself!
Thanks to all the wonderful people who have created tutorials for ukulele cases!! It was extremely helpful in crafting my own and I’m not sure I could have handled the task as well as I did without them!

